Saturday, November 29, 2014

Matchbook Gift Tags


Minimizing waste is something I try to focus on in all areas of my life and there is no time of the year more wasteful than the holidays. We buy wrapping paper, bows, tape, cards and gift tags only to throw them away after Christmas morning. Make a goal this year to challenge how you are wrapping and tagging gifts. If you get creative you'll find there are a lot of ways to reduce you waste. 

One way you can do this is with reusable gift tags. You can make or buy chalkboard tags and use them over and over each year. This year I decided to make gift tags from vintage 1950's matchbooks I found on ebay. The set I bought features beautiful images of Christmas customs from around the world. 


Making a matchbook into a gift tag is really easy. Start by tying a piece of twine or ribbon around the top (fold) of the matchbook.


Next, cut a Post It note to size to fit the back of the matchbook - the part where the strike strip is. Stick the Post it to the top of the back and tuck the unattached end of the Post It into the matchbook to close it. Finally, add a To and From label by hand or using a stamp if your handwriting is terrible like mine. When you are done, you have an adorable, reusable gift tag.


Tuesday, November 4, 2014

Infinity Scarf from a Pleated Skirt

The 80s were famous for plaid, especially in the form of long, bulky, pleated wool skirts. Plaid is all the rage again, but let's hope those skirts remain a thing of the past. There are however a few great things about those ridiculous skirts. First, the plaid patterns are typically pretty classic and still look modern today. Second, when you cut out the pleats they have miles of usable fabric. 

If you've been on Pintrest at all lately, you've likely seen lots of bulky, plaid infinity scarves like this one. 


The first time I cut one on these skirts open I realized it could make my own version of this infinity scarf. For my first attempt, I chose an acrylic blend in a classic Christmas plaid. I love the way it turned out and have been getting lots of compliments when I wear it.


If you'd like to make your own, check out the project steps below.


Project Steps


Step 1: First, you need to find a pleated skirt. You can find these skirts at thrift stores in 100% wool or acrylic blends. When selecting your skirt keep in mind your ability to tolerate wool. Even if you felt the skirt by machine washing and drying it hot, it may still be a little itchy. You are looking for something that when you stretch the bottom end to end (the unpleated part) will be at least 4 - 5 feet across. Here's an example.


Step 2: Once you have your skirt, wash and dry it. For 100% wool I like to felt the skirt a bit by machine washing and drying it hot to make it denser and softer. This will shrink the fabric somewhat so make sure you have a wide enough section between the bottom of the skirt and the pleats before felting.

Once your skirt is washed, cut it up. Start by cutting around the top of the skirt just below where the stitching ends for the pleats. When you're done you should have a large circle of fabric.


Step 3: There will likely be at least two seams in the skirt. If there is more than one seam, look at each one and determine which seam is smallest and has the two sides of the fabric pattern lined up best. You want to leave the seam that looks best and cut the one that doesn't look quite as good.Cut straight up the least attractive seam to open up the circle into one long piece. If you only had one seam you will need to cut that one open. 


Step 4: Next, cut open the hem. I like to leave use the fabric in the hem and typically cut along the threads to open it. Be careful not to cut the fabric, only the threads. 


Step 5: Iron the long piece of fabric to prepare for sewing it. If you cut open the hems and want to use the fabric in them, be sure to press the seam where the hem was flat. It may help to use a spray bottle with water for this step. 

Once you have the piece ironed, lay it out on a long table and trim the uneven side of the fabric straight. This is typically the site where you cut just below the pleats. You want the fabric to be the same width for the entire piece. I find it easiest to do this by folding the fabric lengthwise with the right sides together and using the straight edge of the hem as a guide. If you have a rotary cutter and self-healing mat it use it for this step. 


Step 6: If your fabric is already right sides together lengthwise, you are good to go. If not, fold the fabric in half along the longest side keeping the right sides together. Line up the two sides and pin the entire length of the piece.


Step 7: Once pinned, sew along the long side of the entire piece leaving about 1/4 inch of seam allowance. When you are done you should have a tube of fabric. Turn the tube right side out. 


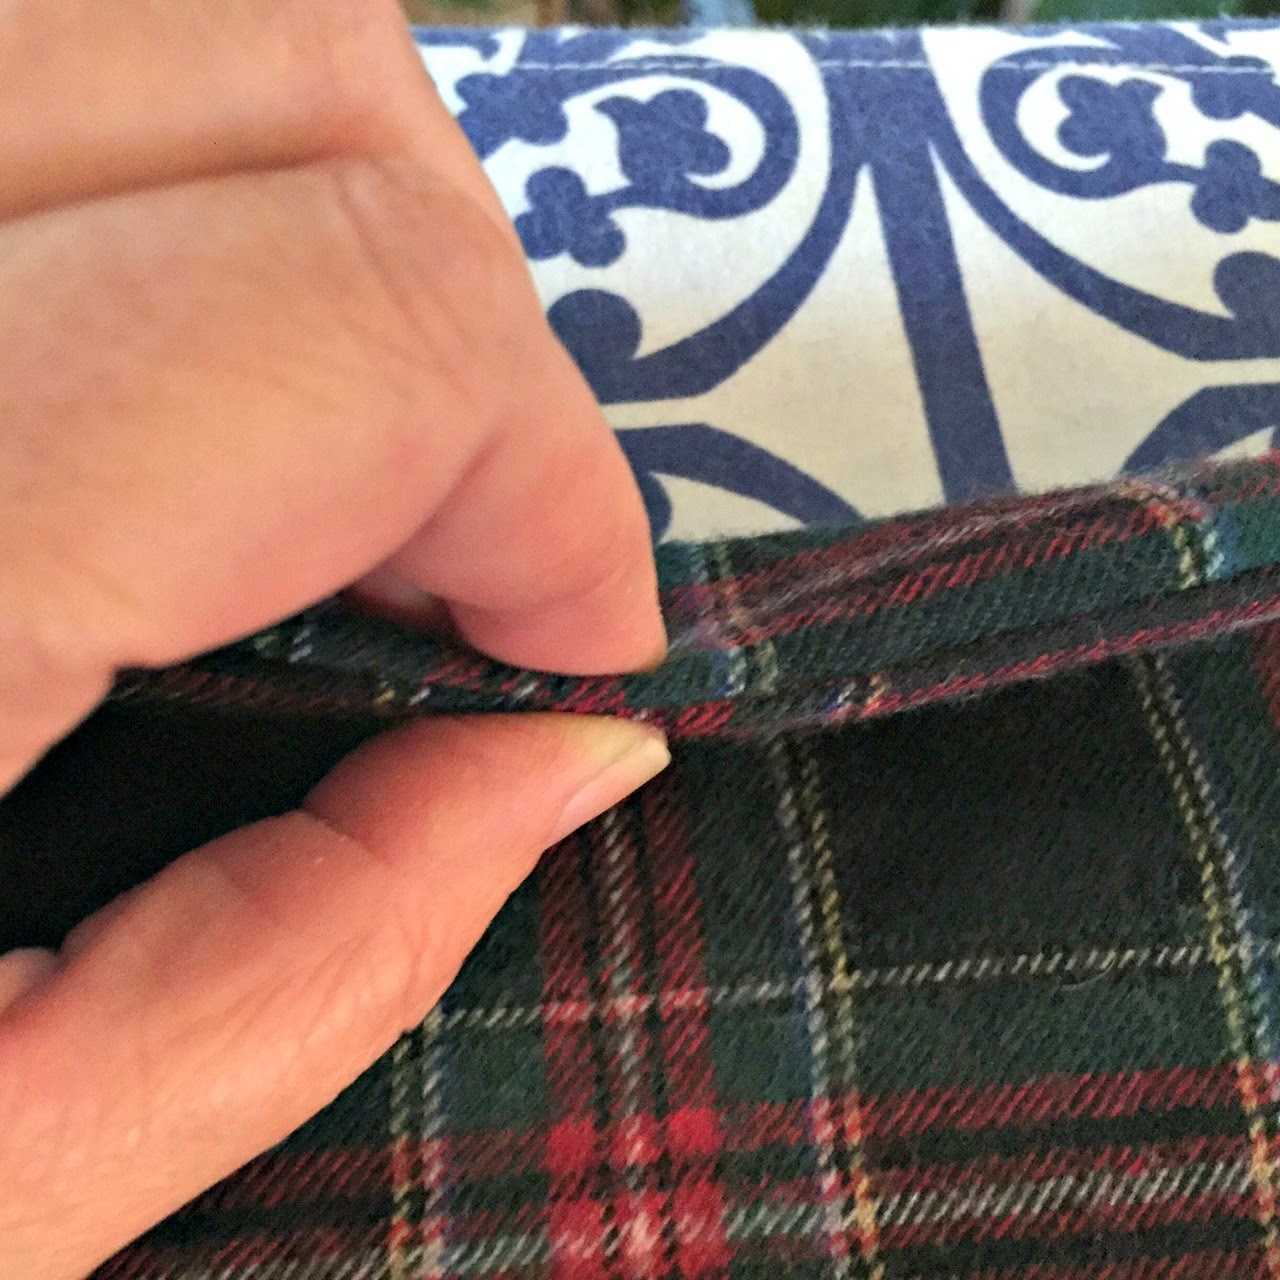
Step 8: Now that the tube is right side out you need to iron it flat. Start by ironing the seam side. Using your thumb and forefinger, roll the edge with the seam until you can see the stitches and then press it flat. 


After pressing along the seam for a small section, go back, smooth the piece and press the side opposite the seam.


Step 9: When the entire length is pressed is should really start to look like a long scarf. Trim the two ends of the piece if either of them are not straight. Then take one end and fold the raw edges inside and press. The picture below shows what it would look like if it was inside out.


Step 10: With your piece right side out take the unfinished end and stuff it into the finished end (folded and ironed end from the previous step). You want about a half inch section of the unfinished end inside the finished end. Make sure there isn't a twist in your scarf, you want a continuous loop.

Straighten the two pieces out keeping one tucked inside the other, and line up the plaid as much as possible. Then pin the two pieces of the join together making sure to pin all the way through. 


Step 11: Flip the pinned join over to make sure there isn't an bunching of the fabric on the back side. 


Step 12: Sew along the join as close to the folded and pressed end as possible. Check as you go to make sure the sides haven't come untucked and that you are sewing through both ends of the fabric. 


Step 13: Press the new seam if necessary then try it on and enjoy!


Thursday, October 30, 2014

Christmas Stockings from Wool Skirts


Wool skirts are a great source of quality material for lots of sewing projects. I prefer 100% wool as you can felt the wool before using it by machine washing and drying it hot. This makes the material denser and warmer and softens it up a bit. I've used felted wool skirts to make blankets, pillows, and even hand-hooked rugs. 

For this project I'm using my felted wool for Christmas stockings. This is a fun, easy project that's perfect for the holidays. If you'd like to try making these yourself, the project steps are included below. The stockings are also available for purchase in my Etsy store here.


Project Steps


Step 1: To begin this project you will need to source some interesting wool skirts. Shop your closet or your local thrift store They don't need to be 100% wool but should be at least 50% wool. Look for skirts with interesting patterns, color and texture along with a good amount of fabric (mini skirts will not do). Once you have your skirts cut out the waistband and along the seams until you have large usable sections of fabric. I recommend "felting" them to make the wool denser and softer by machine washing and drying them hot.

Step 2: If you have a pattern for a Christmas stocking you can skip this step. I did not so I used a Dollar store stocking to make a pattern out of newspaper. To do this, lay the stocking on top of the newspaper and trace around it leaving at least an extra 1/4 inch all the way around for your seam allowance. If you would like to alter the shape a bit you can do that as well. I wanted a slightly longer toe so you can see that I extended just that bit.


I wanted to use a contrasting piece of fabric for the cuff of the stocking so I made a pattern for that too again using my Dollar store stocking as a guide.


Step 3: Once you have your pattern ready, find a larger section of fabric for the body of the sock and a smaller one for the cuff. I like to use contrasting pieces of wool to give the stocking more interest. Be sure to iron all of the material you are using before you start cutting and sewing.

For the body, if you have a large piece fold it in half with the right sides together. If you have two smaller, longer pieces (typically the back of the skirt) put them on top of one another with the right sides together. This will ensure you have a right side for both the front and back of the stocking. Lay the pattern on top of the double layer of fabric and pin it through both layers.


Step 4: With the pattern secured in place, cut both layers of fabric all the way around the pattern. Put any leftover fabric aside as you may want to use it later to make the stocking loop.


Step 5: Unpin the pattern from the two layers of fabric but do not separate the fabric layers. The right sides should already be together from Step 3. Pin both layers of fabric together all the way around except for across the top.


Step 6: Next sew all the way around the stocking  except for the top which should be left open.


Step 7: Once you have sewn all the way around, remove the pins and notch out the fabric around the curved sections of the stocking. Be sure you don't cut all the way to the seam. The goal is just to remove excess fabric in any sections of the seam that are not straight. This will make the finished stocking lay flatter once pressed.


Step 8: Turn the stocking right side out and press it flat using an iron paying special attention to the seams. Using your thumb and forefinger, roll the edge with the seam until you can see the stitches and then press the seams flat all the way around the stocking. 


Step 9: Now that the stocking is done it's time to make the cuff. Start by finding a piece of wool that coordinates well with the body of the stocking. You will need a piece that is double the longest side of your pattern. Once you have your cuff material, fold it in half and pin the cuff pattern to the wool with the short side along the fold.


Note the fold along the right (short) side of the pattern in the picture above.

Step 10: Cut around the 3 sides of the pattern but do not cut the fold. You can use a rotary cutter and self-healing mat for this step as the edges are all straight. Put any leftover fabric aside as you may want to use it later to make the stocking loop.


When you are done you should have a long thin piece of material that will wrap all the way around the top of your stocking.


Step 11: Using an iron, fold and press a 1/4 inch seam along one of the long sides of the fabric making sure the unfinished edge of the seam is on the wrong side of the fabric. Pin the fold to secure it.


Step 12: Sew along the seam as close to the unfinished edge as possible (the side opposite the folded edge). Use thread similar to the color of the cuff or a contrasting color if you want the seam to be visible.


Step 13: Fold the cuff in half with the right sides together and pin. The seam you just sewed will be on the outside. Then sew along the short side of the cuff.


Step 14: When you are done with Step 13, you will have a circle for the cuff. Open and press the side seam on the short edge flat with an iron. This will help the seam of the cuff lay flat against the body of the stocking.


Step 15: You're now ready to join the cuff to the stocking. Start by turning the cuff right side out. Slide the stocking (right side out) inside the cuff (also right side out). Line up the seam of the cuff with the seam on the back edge of the stocking (the side with the heel). Line up the edge of the cuff with the edge of the stocking and pin the seam of the cuff to the back seam of the stocking. Then add another pin directly across from the first pin to attach the cuff to the front seam of the stocking (the side with the toe). 


With the front and back secured, add as many additional pins as needed to secure the cuff to the stocking. When you are finished pinning it should look like this.


Step 16: Sew all the way around the top of the stocking to attach the cuff. Be careful when you are sewing that you don't sew the 2 sides together. Check frequently to ensure the opposite side is clear of the sewing needle.


Step 17: With the cuff attached, roll the seam inside the stocking leaving a finished edge along the top of the cuff. When you have the cuff folded evenly across the top, iron the seam inside the stocking to make it lay flat. With the seam is flat, you can also iron the top edge of the cuff if necessary.


Step 18: The last step is to add a loop for hanging the stocking. You can use a piece of ribbon if you would like and sew it inside the back side of the stocking. I wanted my loops to coordinate with the stocking so I made them out of the same wool as the body. If you're using ribbon, cut a piece the size of the loop you want and skip ahead to Step 21. 

If you want to make your loop, start by cutting a piece of the body or cuff material into a rectangle that is 8 inches long by 2 inches high. 


8 x 2 piece of fabric is shown here next to a finished loop piece.

Step 19: Once the piece is cut, fold it in half lengthwise with the right sides together. Secure the long side and one of the short sides with pins. Sew the long and short pinned sides leaving no more than 1/4 inch seam allowance. Make sure you leave one short side open so you can turn your loop right side out. 


Step 20: Using either a chopstick or the eraser side of a pencil turn your loop right side out by pushing along the short, sewn side of the tube. The goal is to push the unfinished seam into the body of the tube. This step is a bit tricky to get started and may take a few tries but you'll see once you get a bit of fabric stuffed inside the tube it's pretty easy. 


Step 21: When you have your loop right side out, you'll need to press it using an iron. Using your thumb and forefinger, roll the edge with the seam until you can see the stitches and then press flat. 


Step 22: You're now ready to attach the loop to your stocking (or ribbon if you skipped making the loop). Fold the tube in half to form the loop. One side will be finished and the other unfinished. Put the unfinished edge in the back and the finished edge on top of the unfinished edge. Pin both edges of the loop to the back seam of the stocking, close to the top (likely you will be pinning it to the cuff material close to the seam you folded inside the stocking as shown below).


Step 23: Use the sewing machine to sew the loop to the stocking making sure you catch all 3 layers (stocking and the front and back layer of the loop). To ensure the loop will be strong, you'll want to sew back and forth along the same seam several times. If possible, use a thread color similar to the color of the cuff as the stitching will be visible in the back of the stocking. You can also do this step by hand if you don't want to see the stitching. 


Step 24: Your stocking is pretty much done now. As a last step, you may want to tack the seam where the cuff joins the stocking beneath the loop using a needle and thread. This will secure the fold of the cuff. 


Tacking the back seam where the cuff joins the stocking beneath the loop.

I also suggest tacking the front side of the cuff (along the edge where the toe is). When doing this, sew by hand and make sure your stitches are not visible by keeping them all underneath the cuff.


Tacking the front seam of the cuff along the side where the toe is.

And now you can enjoy your finished stocking (or start working on a second one).